⚠️ I realize that AI functionality is a key selling point for the Affine development team’s Cloud version. As a self-hosted user and beneficiary of open source software, I strongly recommend that everyone who sees this article support the Affine team with actual actions. If you really need AI functionality, I strongly strongly recommend subscribing to the official online version.
At the same time, I have completely disabled the AI functionality in my self-hosted version to show my support for the Affine development team.
I used GitHub Copilot web version to analyze the functionality of the copilot directory in Affine repository’s tag v0.25.5, and obtained the following conclusions:
- This confirms my previous judgment - Affine’s AI model providers and model names are hardcoded;
- Third-party APIs can be used, and you can customize model names like deepseek-chat or qwen3-max, but the instance must have the
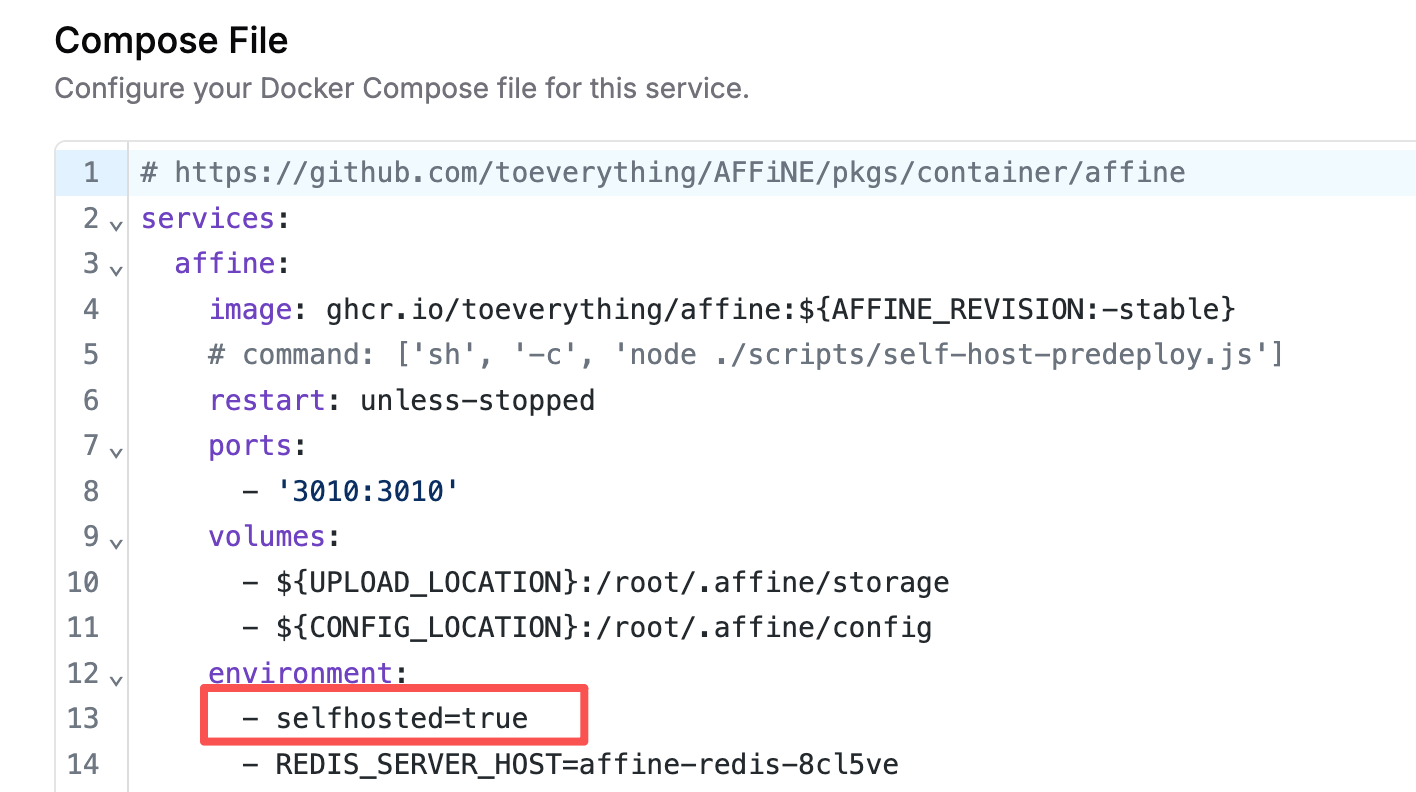
selfhosted=trueenvironment variable set;
Important! Important! Important! To implement custom third-party AI models, you must ensure that when deploying your Affine application, you set the selfhosted=true environment variable, because the program uses this environment variable to determine whether to enable support for third-party AI models. I believe this is the reason most people fail to configure it!
From here, it’s very simple. In the OpenAI configuration box, fill in the third-party baseURL and apiKey you want to use. Then, in the custom model JSON, replace the model names with deepseek-chat or deepseek-reasoner as needed.
{"apiKey":"sk-xxx","baseURL":"https://api.deepseek.com"}
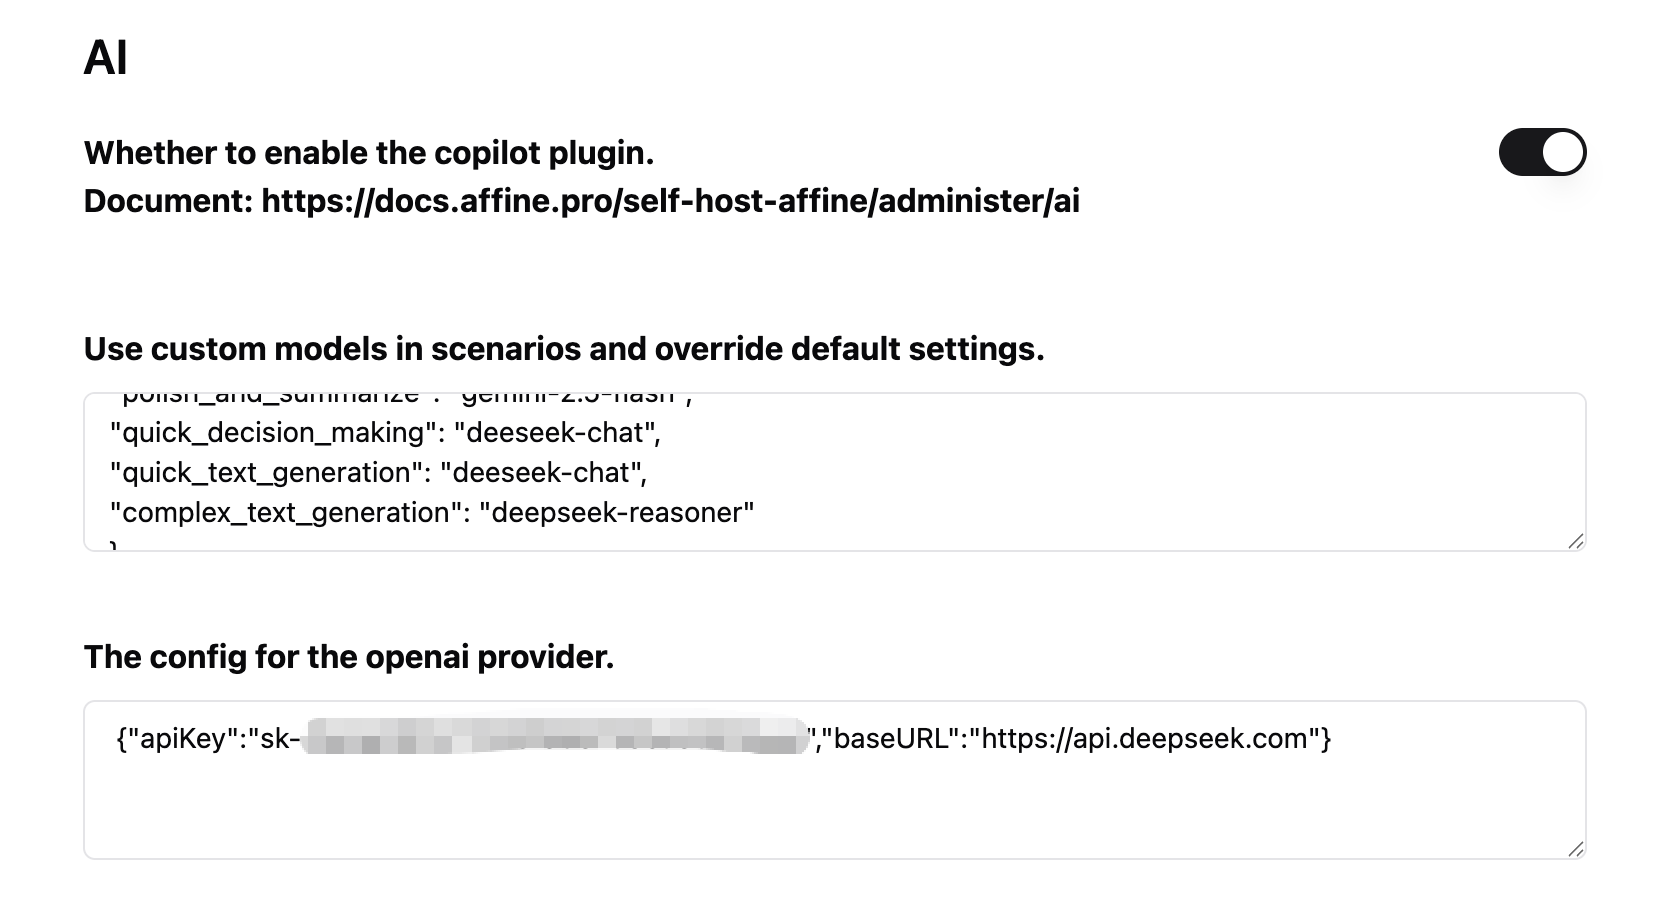
Note: When customizing model names, you must fill in the actual model names that exist in the third-party API, i.e., the available model names returned when requesting
/v1/models.
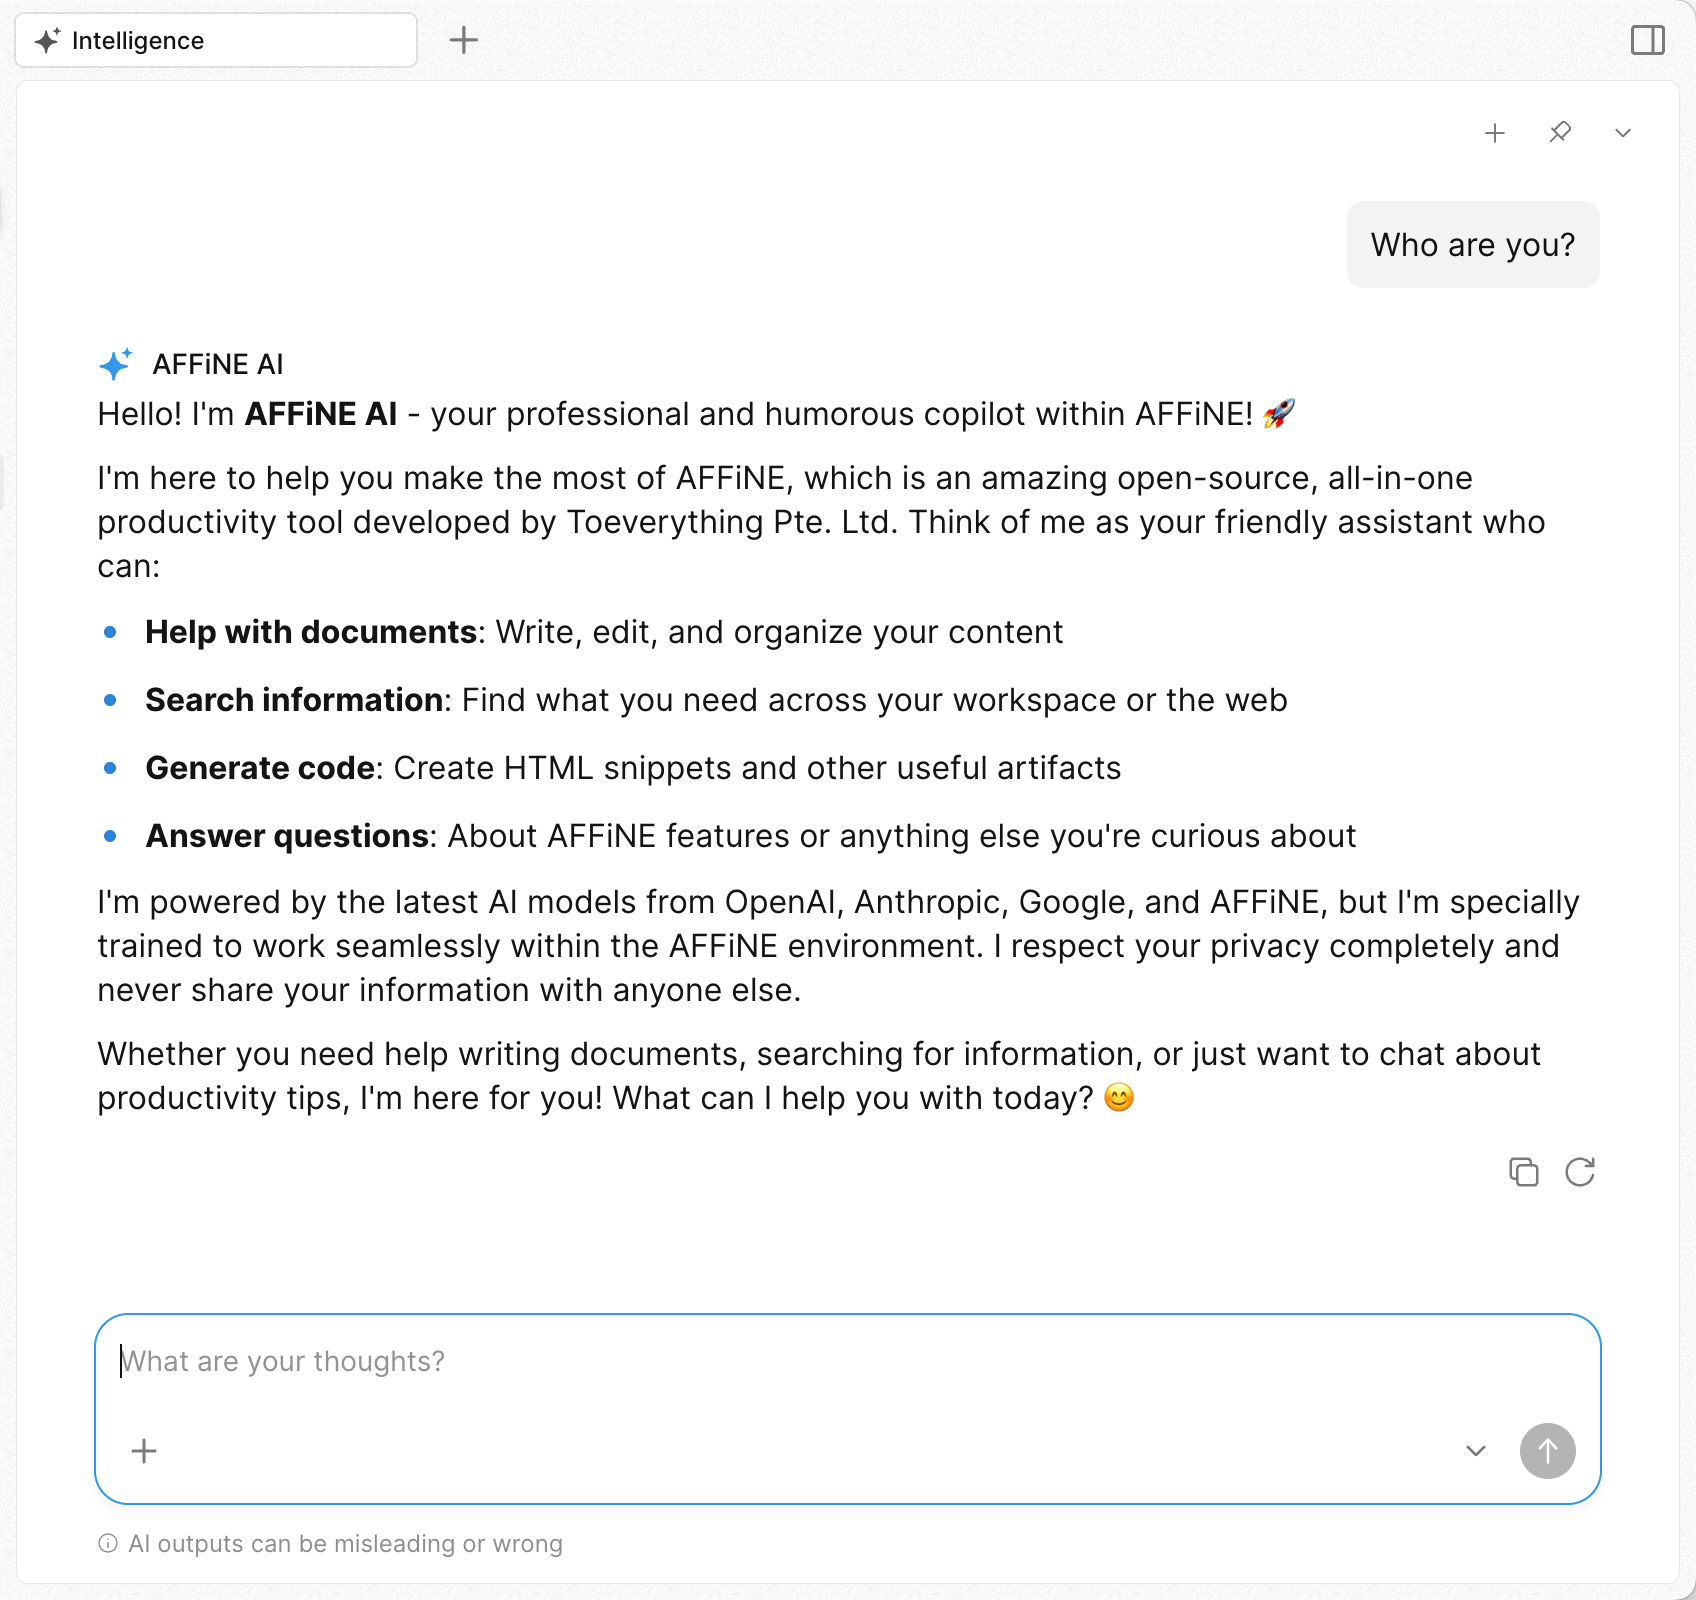
At this point, you can already use AI for conversations, text generation, translation, expansion, and more in the Affine client. But if you want to further implement data embedding functionality, you can jump directly to the last section “Reverse Proxy for Gemini API”.
Since the Affine official community published the AI for selfhost #11722 post in April 2025, discussions about AI functionality configuration issues in self-hosted environments have never stopped.
As a self-hosted Affine user, I’ve made some attempts at AI customization. While it may not cover all requirements, I can at least ensure that following this approach will work properly.
What You Should Know
For self-hosted Affine custom AI models, there are several essential things to understand:
- Custom AI model functionality has been available since v0.24.0;
- Models from Claude, OpenAI, and Gemini providers all require separate configuration;
- If using proxy tools like LiteLLM to simulate Claude models, you need to replace the
@symbol inclaude-sonnet-4@20250514with-;
Ideal Scenario
Affine has hardcoded AI models in the backend, so the ideal usage method is to directly fill in each provider’s API Key. The effect goes without saying - using the original manufacturer’s models directly, with Affine having associated specific models for particular tasks. Strictly speaking, this should provide the best work quality.
However, as is well known, all three AI platforms have availability issues in certain countries. There are reasons why platforms don’t provide services, and there are also reasons why countries restrict access.
Of course, even if users are located in non-restricted countries, they might prefer to use their preferred AI services due to privacy preferences or cost considerations, such as private models running on Ollama, LM Studio, or AI aggregation platforms like openrouter.
Handling Each Provider Separately
The second point in the “What You Should Know” section above determines that currently, there’s no single configuration that can solve all problems - at least I haven’t found such a solution.
Assuming we want to completely use third-party models, we need to handle the configuration for all three platforms separately.
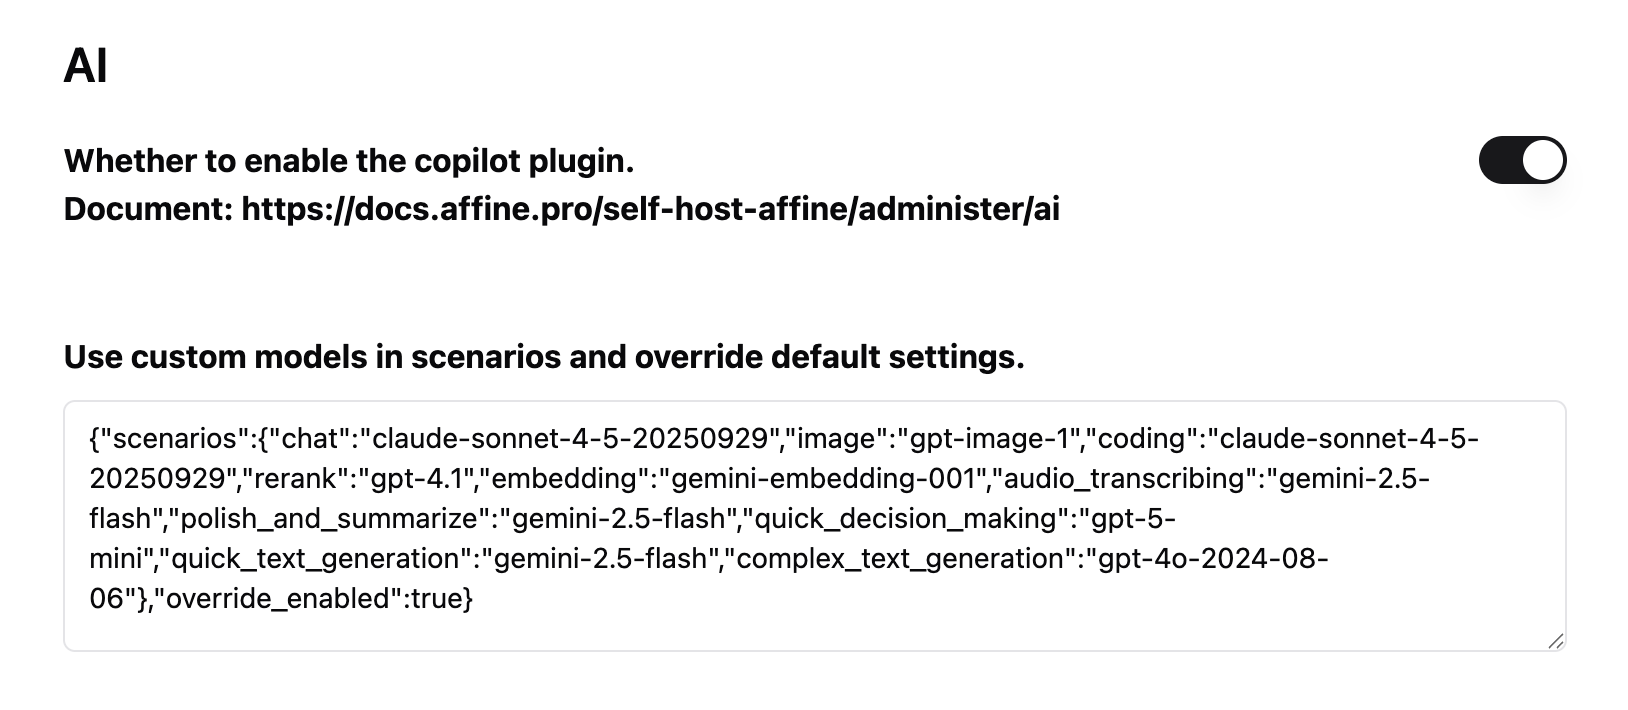
Custom Model Configuration
While writing this article, I’m using Affine v0.25.1. The custom model settings in AI configuration have been adjusted based on the hardcoded model names in the project GitHub repository code.
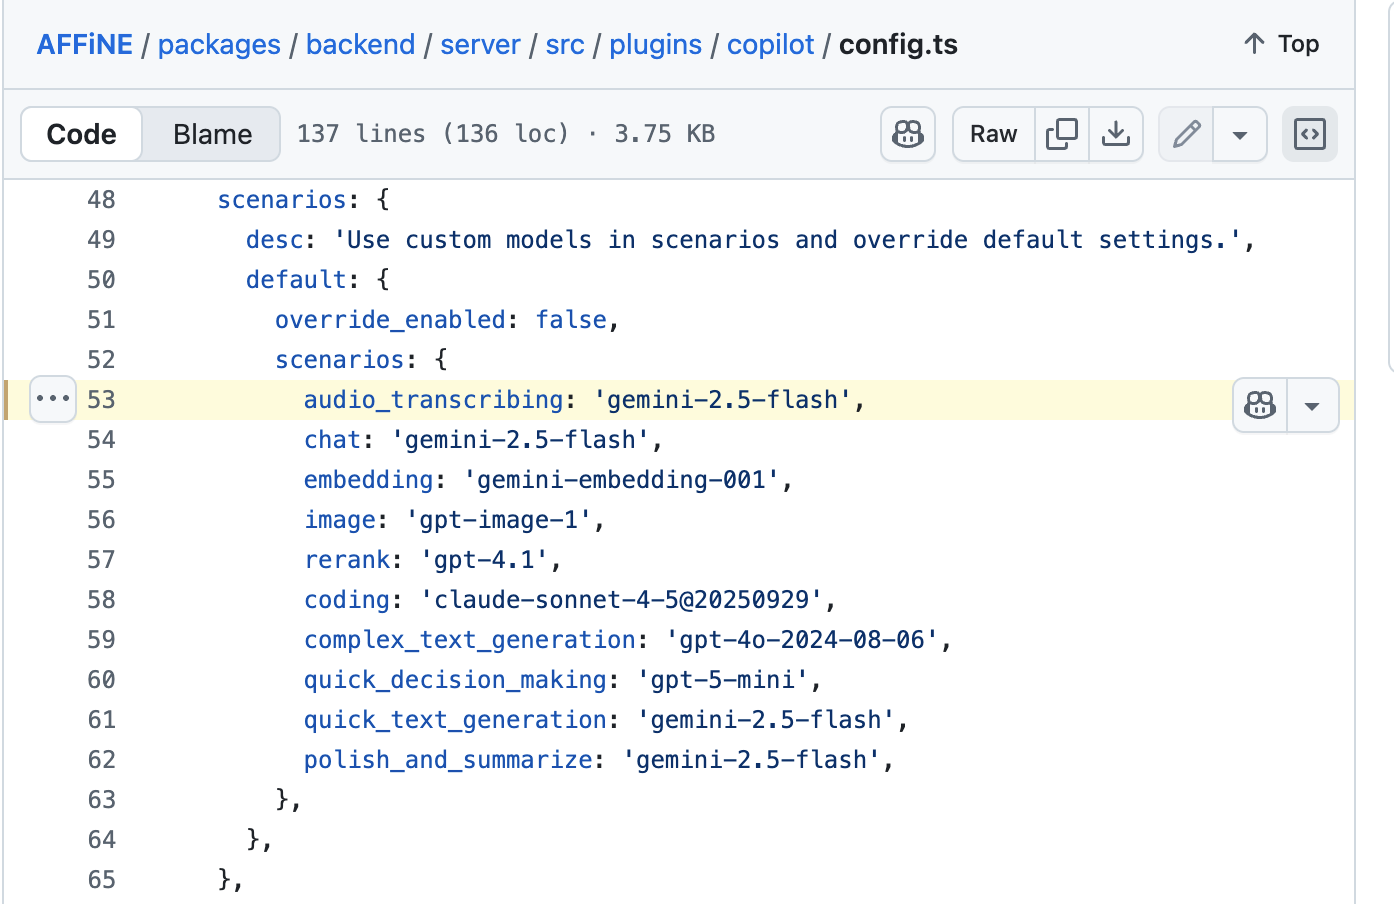
My practical conclusion is: don’t attempt to modify model names in the custom JSON. Because if you modify them, you’ll definitely encounter errors when using them in the client.
You must keep the names in JSON consistent with the hardcoded model names in Affine source code. Perhaps the only thing you need to do is replace the @ symbol in Claude Sonnet 4.5 model name with -.
Since we can’t change model names but still want to use third-party models, perhaps the only thing we can do now is use tools like LiteLLM to simulate third-party AI models with these specific names.
Reverse Proxy for Gemini API
Actually, the Gemini models used by Affine are only gemini-2.5-flash and gemini-embedding-001, both of which are very inexpensive models. If your network can directly access Gemini API, it’s recommended to directly set up the original API and Key in Affine.
If your network cannot directly access Gemini API, you can use Caddy Server or Cloudflare Worker to create a reverse proxy service. Then configure it in Affine:

Cloudflare Worker
Note: The default .workers.dev domain assigned by Cloudflare worker is blocked in some countries. In such cases, you just need to bind your own domain to the worker.

Code as follows:
/**
 * Welcome to Cloudflare Workers!
 *
 * This is a transparent proxy worker.
 * It forwards requests to a designated upstream API server.
 *
 */

// ------------------------------------------------------------------
// CONFIGURATION: Change this to your target API endpoint.
const UPSTREAM_HOST = "generativelanguage.googleapis.com";
// ------------------------------------------------------------------


export default {
  async fetch(request, env, ctx) {
    // 1. Create a mutable copy of the original request URL
    const url = new URL(request.url);

    // 2. Core step: Replace the URL's hostname with our target upstream server
    url.hostname = UPSTREAM_HOST;

    // 3. Create a new Request object using the modified URL,
    //    and directly "clone" all other properties of the original request
    //    (method, headers, body, etc.).
    //    This is the most concise way to implement a "transparent proxy".
    const newRequest = new Request(url, request);

    // 4. Send the newly constructed request to the target server and directly return its response.
    //    The fetch() API handles all network details.
    console.log(`Proxying request to: ${url.toString()}`);
    return fetch(newRequest);
  },
};
Caddy Server
# Your custom domain, Caddy will automatically apply for and manage HTTPS certificates
my-ai-proxy.example.com {
    # Reverse proxy all requests pointing to this domain to the Gemini API host
    reverse_proxy https://generativelanguage.googleapis.com {
        # This is a very important best practice:
        # Set the Host Header forwarded to the upstream server to the target server's domain.
        # Caddy's {upstream_hostport} placeholder automatically handles this.
        # This prevents issues with target servers that route or validate based on Host Header.
        header_up Host {upstream_hostport}
    }

    # (Optional but recommended) Add access logs for debugging
    log {
        output file /var/log/caddy/ai-proxy-access.log {
            # Set log rotation to prevent single log files from becoming too large
            roll_size 10mb
            roll_keep 5
        }
    }

    # (Optional) Enable compression to save some bandwidth
    encode zstd gzip
}
This way, you can happily use custom AI models in Affine.
Author: TorchTree
Original URL: https://torchtree.com/en/post/affine-selfhost-ai-configuration/
Publish Date: 2025-11-01
License: CC BY-NC-SA 4.0